Jumat, 26 Agustus 2011

Quality Glass Fusing Supplies


pieces of glass are joined through a process of fusing glass. Glass partial melting at high temperatures, and then joined to another dio.Električni furnace used to heat and melt the glass pieces and soldering with water joined together. Glass fusing supplies can be very expensive if you do not know the right place to look.


fusing technique used


Typically, thin layers of glass layered one on top of other colors and can be used to create different patterns. This is known as stacking. This stack is then located inside the electric furnace and heated. Finally, the pieces are joined, and the temperature was then brought down quickly to avoid devitrification.Carinsko pieces can then be cooled over time, and while it soaked into the precise temperature that is very important for annealing. This is done so that there is no uneven cooling and breakage occurs in the product.


fusing supplies


fusing glass supplies can be expensive if you compared prices from several stores. If you can not find a store near you, then you could look for one online. You can compare prices of different suppliers of glass fusing. If you are a beginner, May start by buying only essential items. For beginners, here is a list of things that May be you:


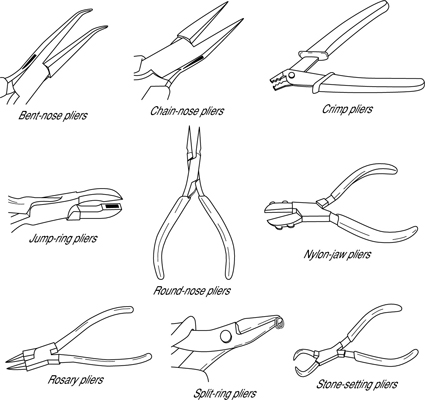
The most recent Pliers: These pliers are used to reduce the ionic glass on the number of pieces - as much as you want May. These pliers are very useful when you have a small area that needs to be usitnjeno.Uska and curved lower jaws fusing devices can access tight places and provide enough leverage, so you can get a clean break.


Cutter Oil: Glass cutters chamber that can today be filled with oil. Earlier cutter had to be dipped in oil and then used for slitting. The type of oil used is of course a personal preference. You can use kerosene, motor oil, oil stove, oil lamps, or any oil of your choice.


Fuses Glass: You can find these in various types and sizes. Get a compatibility test done before you use glass.


glass cleaner: You need to be aware of how to clean fused glass. This will give a good finish on your product.


glass cutters: Look for a good glass cutter on the market. There are many different types available. Find one that is convenient to use.


Glass Pliers:. You could choose between running pliers grozing pliers combination pliers and much more


Glasses / Goggles:. This fusing glass supplies are needed to protect your eyes when working with glass, so you can avoid debris from harming your eyes


furnaces: This is the most important part. You have to melt the glass to be joined.


a dust mask:. This is used to limit any glass dust to enter the respiratory system


Other fusing material may include items such as high temperature gloves, kiln shelves, Haik brush, books and tapes, fusing gloves, kiln furniture and much more.


Read More >>

Kamis, 25 Agustus 2011

Making Jewelry - Wire Wrapping 101


Do you know what is a basic wire working techniques, which is so useful in making jewelry that is well worth taking the time to learn and practice? He is known as a wrapped loop. There are photographs to accompany this article. Can be found at SyZyGy Nakit.Radi link on the page can be found at the end of this article. Go to About Us and more. Under the main menu heading you will find a Wrapped Loop;. Click on the


If you do not know how to solder silver and gold, this is the safest way to connect one design element to another. It will also make a pendant for any bead, make your own chain and produce wonderful earrings that will not come apart.


To begin with, you will need:


1 chain pliers


2 Round nose pliers


3 cutter


4 20 or 22 gauge wire or 3 "Headpins (the wire should be half-seriously)


5.asortiman beads


Chain Pliers (CNP) as needle nose pliers, with no grooves on the inner side of the jaw. This allows you to grip wire without marring it. Round nose pliers (RNP) are two smooth, tapered jaws that are larger by cutting zajedničkom.Za should be semi-flush. The frame joints are better than the joints as you would find the scissors.


I rarely use the Headpins. I love strings, because it is less disruptive, but if you do not like the look of hand-headpin, then by all means, use a commercially made ​​Headpins. It is best to practice with 3 "Headpins because it gives you more work. So, let's begin.


If you use wire instead Headpins, cut a piece that is about 10 "long. Any more and gets a little difficult to manage. Straighten cable. To headpin, grab the wire at one end with the very tips and chain nose pliers. Fold the wire back on itself, but not all. Pinch the end closed the rest of the way with CNP. If the hole in the bead is large, the greater curl. you do not really want the "head" is pulled up inside the grain.


Insert the wire or headpin the bead, bearing in mind that whether or not there at the top and bottom of the grain. You'll need to leave space between the bottom of the loop you're about to and on top of bead to make. Depending on how much you want to make wire wrap, wire it to understand the advice Round nose pliers, or further to the jaw. This is largely a matter of experience and a lot depends on the wire gauge used. Then make a right angle to bend the wire or headpin.


Then, decide how you want your big loop to be completed. For very small loop using round forceps tips. For larger loops, use of the RNP, which is closer to the wrist. Grasp the wire with the RNP, so that one of the top jaw.


Hold Round nose pliers, so that at the end of the wire pointing away from you. Using the other hand put your fingers near the RNP and push the wire toward you across the jaw, which is at the top. Then pull the wire around the rest of the way to the bottom of the jaw stops you.


Slightly loosen the grip on the wire with pliers round, so you can rotate the bottom jaw with the times without losing their place along the jaw. Finish getting the wires all the way around the jaw. You may have to pull some strings to the side to pass the bead.


Remove loop from the pliers and inspect for symmetry. Everything has to be at right angles to each other. Also, the loop should be directed to the shaft of the wire as it is held to the bead. If you do not loop in the center, re-insert the round jaw pliers until it stops, grab the loop with the pliers and roll the hand away from the excess wire to the loop at the center. Correct the excess back to the right angle.


Then, using the chain nose pliers, grasp the loop with the excess wire up.


Keep the loops tight, and on the other hand, working away the excess wire around a short wire loop and the top of the ball. Work slowly and steadily, so you get the trim right next to each other. Speed ​​can be your enemy here.


When your latest film touches the top of the bead, stop. Use your cutters to cut the excess wire from the rest of you better možete.Riječ šikare.Strana the semi-cutting pliers, which is smooth and straight cut with the smallest točke.Strane (pictured at the beginning of this article) that the angle will produce the greatest point at the end of the wire. So it is best to have a flat side facing the cutting wire that will stay with an angle toward the side of "waste" of wire. Use chain nose pliers gently squeeze the end of the wire into its final position. Run your finger over it to make sure that it will not push or scratch the wearer. <[/ P>

Voila! You've made your first wrapped loops. You are well on your way to creating beautiful jewelry. Last thing to remember is practice, practice, practice. Do not expect to do perfectly the first time or even seventh. No, not stick to it. As I said at the outset, this is one of the most valuable wire wrapping technique that you can learn.


Read More >>

Rabu, 24 Agustus 2011

Useful Construction Hand Tools Crafted by Leading Manufacturers


Hand tools come in different forms and has different uses. It can be used to drill holes, cut pieces of wood, metal or plastic slice. These are very useful in any industrial building. Users trust only the leading manufacturer of quality, accuracy and precision.


Denali, DeWalt, and Stanley just a few of the leading manufacturer of construction hand tools in svijetu.Denali tools are made ​​through an extraordinary combination of quality workmanship and loaded with professional grade značajke.Kupac value of feedback.


DEWALT Construction tools are well designed and heavy duty to last longer. I take pride Stanley tool to exceptional quality, durability, ergonomic standards, and reliability.


Some of the benefits of building popular hand tools:
Denali 18 Volt Cordless 3/8-inch Drill / Driver Kit-582 146


Drill Kit at 18 V, wireless and 3 / 8 inches from the Denali is boasting high quality design and functionality. It has a powerful 2-speed motor with a battery. It can rotate 360 degrees. Powerful engines allow for high performance levels of F and has a brake which makes drilling and screw lightly.


24 torque settings and drill to prevent stripping of screws. A 2 on board bubble level with the plane drilling. While Jacobs keyless chuck from 3 / 8 inches is beneficial to provide quick and easy bit changes.


handle drill has an ergonomic design and is molded with a soft material. This means that the process could provide a more compact, comfortable grip. A workout using two Denali 18V batteries.


Denali 582 146 38 Drill comes complete with two double-ended screwdriver bits, and the board of pohranu.Kit also includes a battery of Denali and nylon bag. It carries a 1-year warranty and weighs 11.2 pounds.


DEWALT Heavy Duty Palm Nailer-D51180
DEWALT D51180 is a lightweight but heavy-duty palm nailer. This can drive fasteners lako.DEWALT nailer also has a metal casing. It's tough to withstand any kind of abuse the site.


This is a comfortable leather grip to reduce vibration. It is also slip-resistant to prevent accidental kapi.Zakivač also has a magnetic tip. This allows the nail accommodation in tight spaces with ease.


nailer operates at 70-120 psi pressure, and has a diameter of 6d-16D standard. It comes with oil, fitting 1/4-inch, and goggles. It is difficult £ 2.65.


Stanley 9-inch needle clamp-MaxGrip 84-887
Pliers with maximum traction is believed to be highly functional, heavy duty and specially designed to perform effectively Stanley Needle forceps. This is a larger capacity jaw, along with a parallel jaw movement, kept the materials better.


These pliers Measure 9 inches and comes with a solid steel jaws. This means that the body is made of forged steel alloy. This increases the force and thus exceeds the ANSI standards for the moment.


and special hinge clamp design is useful for cutting, as it provides greater leverage. It also reduces the effort rezanje.Kliješta with ergonomic handle. This two handle material that provides maximum secure and comfortable grip. I wear a hole pliers is useful for easy hanging or tethering.


So this is Stanley 84-887 9-inch MaxGrip Needle clamp supports a limited lifetime warranty.


Read More >>

Selasa, 23 Agustus 2011

GBC Premium Oval Hole Spiral Coil Crimpers Review


Summary:


    GBC premium oval hole spiral coil crimping pliers (part number 7300551) are some of the highest quality crimping pliers are available in the market.
    These special pliers are designed for users who have a spiral coil binding machine or a punch that uses modular oval holes. With oval hole pattern is necessary for the ends of the spiral coil to be wrapped with more throws, so that coils do not spin off the book when the pages are turned.
    These pliers to cut and crimp the ends of coils in one go and are an important part of any binding system.

Strengths / Features:


    For users who have a coil binding system that produces oval hole, the top coil crimping pliers are a necessity. Standard coil crimping pliers will not consistently produce long enough to prevent the throwing coils of working your way from the edge of the coil bound documents.
    The standard coil crimpers to find it for 4:01 and 5:1 pitch round hole spiral binding. However, the coil crimpers are an excellent choice for users who are legally binding documents with other pitches of spiral coil. Users binding documents using a 3:01 pitch spiral coil, using a 3:1 pitch coil with patter Proclick holes or use a 2.5:1 pitch coil with 2:1 pitch binding machine you will want to use the pliers to crimp the end of their documents.
    plastic handles of these crimping pliers are designed to make them easy to hold and easy to use. However, it is important to remember that red dot on the crimpers to the ceiling and the spine of the book is facing you.
    This coil crimping pliers can also be used with a standard 04:01 or 05:01 pitch coil without looking odd or uncomfortable. This will prevent users from having to own two pairs of pliers coil binding.

Weaknesses / Limitations:


    These premiums coil crimpers will cost about twenty dollars more than the standard pair of coil crimping pliers. Although it's not a big amount of money, it is enough that some users consider whether an upgrade is worth. In some cases, and others are not.
    Although the premiums for crimping pliers, they really are not any easier to use than the standard coil crimping kliješta.Jedina thing that makes them the premium is the fact that they have more pitching for the oval hole, or even binding resins.
    high volume users sometimes complain that the task of crimping over the spiral coil binding spines is tedious and time consuming. These crimping pliers are not helping the problem. Organizations that bind a large number of books May want to consider an electric coil crimper like Marlon crimper.

Recommendation:


    for users who need to bind documents using spiral coil oval hole pattern, 3:1 pitch hole pattern or a pattern of land 0.400 coil crimpers are definitely a must.
    They work with both standard and specialty types of coils, which makes them a versatile tool and a decent investment. However, it is important to bear in mind that these tongs are easier to use and does not save time over standard coil crimpers.
    Thus, users who do not ever plan binding documents with a specialty coils May found that the standard coil crimping pliers are suitable for their needs.


Read More >>

Jewelry Making Basics


The best way to get started with making jewelry with wire bead. Buy a simple basic kit and buy a bracelet jewelry making instruction books that relate to and understand easily.


jewelry making can be time consuming and can be frustrating when first learning, but I think it's very therapeutic as anything, it's so worth it when you can produce stunning necklace or bracelet out of a pile of beads and string and tell people 'I made to'.


the first things you'll need to start making jewelry some beads and wire. Beads come in all shapes and sizes, but the most useful ones will be called a crimp bead. These very small balls safely within your wires in a loop, so you can connect the buckle.


Now the wire is loose concept in jewelry making, because it includes items such as metal wires, and the 'floppy' as the Beadalon wire (metal-coated wire) or fireline (TM) (I liken to the fishing line). You'll also need some tools if you plan on advancing skills of jewelry making in the future or you will get some mighty sore fingers and ruin your kitchen scissors! (* Note:. Some people will tell you that you will need a dedicated space to be able to make your jewelry creations, but it just is not so I started off on the wing with bead board then moved up on my dining room table when my bead stash got a little too .)


You'll also need a special jewelry making pliers, curved nose, I discovered (chain nose) pliers the best thing I can find them more versatile, pair flat nose pliers that look like a smaller version of the regular pair of pliers and a pair of round nose pliers, also you will need a dedicated pair of sharp scissors (did I mention that you are not using your kitchen one?) and a pair of wire cutters. Do not be tempted to clamp the teeth as this will mark the silver wire, you can wrap masking tape around them if you need some grip, and you will need a glossary of basic things such as nodes, wires scales and types of beads as there are some balls you can use the metal wires that are not suitable for use with the Beadalon for example, and that is because sometimes the beads have sharp edges, within which it will eventually wear down the wire.


For me, when I started making jewelry seven years ago, I knew nothing about it. I started with a tiara from the Hobby Craft kit that a friend had bought for himself to do. She could not be bothered with it so I asked if I could go. Presto! I made a tiara. You can, of course, books on jewelry making course in your area that can be a lot of fun and you get to meet like minded people are fantastic, they give you jewelry making supplies you will need and you'll come away with a beautiful piece of handmade jewelry by you made all by yourself.


I will soon be producing papers on the basic techniques of jewelry making and what they mean.


Read More >>

Senin, 22 Agustus 2011

Safety Wire


This guide will show you how to properly use a safety wire. Several security organizations require wires, including FAA, FIA, SCCA, NHRA, and many others.


Most of the security wiring varies by 0.020, 040 in diameter. For most applications consist of stainless steel or Inconel, although copper and other metals can be koristiti.Dvije main purposes of safety wire are:


1 Retain bolts and components from falling off the vehicle in case of failure.


2 Prevent closures due to depart from vibration or other environmental reasons.


Several chemical compounds, as well as a nylon nut to advertise the same claims. Although these products are excellent in preventing back out, they did nothing to keep failed components. Also, products are becoming ineffective at high temperatures.


drilled bolts for safety wire


The first step in a safety harness any of drilling holes for wires to pass. Due to corrosion issues I only recommend drilling stainless steel, titanium, aluminum or screws. If these materials are available and advise finding a pre-drilled screw properly treated after drilling. Regular screws and bolts are pretty straight forward. You'll be sure and drill the smallest hole that will allow your gauge wire to pass through them. While drilling you should use a lot of cutting fluids and go slowly. There are jigs for it, but I suggest you make your own vice jaws with a small piece of soft wood, and an additional screw. Banjo bolts require a special procedure with regard to the fact that they are hollow.


Drilling banjo bolt for safety wire


beginning banjo bolt drill to drill a shallow hole almost at one of the corners as it will appear above in red. Then turn 30 degrees and drill a little deeper into the hole as shown above in blue. At the end of another 30 degree turn. This time drill all the way through as shown above in Chartreuse. Below is the finished screw.


Banjo Bolt


In this example we will assume that you want to wire the two screws and banjo fitting together. First, measure the distance between all points of attachment. No point should be more than 5 "in spite of the total distance should be less than 20". In this example, all 3-point 3 "total. Take the total distance and multiply it by 3 to a length of wire you need. So in our example I started with a 9" wire. Start by threading wire through the first screw and bending back on itself in the middle as shown below.


Security Wire


with wire pliers twist the approximate distance to the next along the screw as shown in the following sliku.Broj turn, you will need depends on the gauge strings you use. It usually occurs in the wire frame will be označene.Jednostavan how to count to know how many twists twists every pull its calipers čini.Postaviti and use it to make three twists per pull. Assuming that I wanted 9 twists per inch, and I had one inch to cover, I'd pull the lever 3 times. For two inches would pull the lever 6 times.


Step 2


Now, none of the wires leading through the next bolt. You will want to do it in a way that the wires do not want to tighten the bolt to loosen. Now twist the next segment leads to the third bolt.


Step 3


Now, thread wire through the last bolt and twist the rest of your strings. About half an inch past the last bolt you can trim off the excess wire and bend the wire down to sebe.Razlog why pigtail wire to prevent the stabbing with it later.


Read More >>

Homemade Lures For Bass Fishing


There are many advantages to making your own lures for bass fishing. Not only will you save a lot of money, but you can customize them in a thousand ways. Different parts are often combined to create a lure and using different colors, weights and sizes that match specific fishing situations, you can make lures that are specific to your fishing situation. Making lures for bass is a good way to make custom designs that can increase your catch, you never know until you try. With this article we will try to offer you five simple steps to make your own lures. Here is what you will need: making bait wire, pliers, inline spinner body, rubber spider skirt, beads, Buzz bait knife, rivet collars

.

Step 1 - stick to 8 inches long ordeal making wire with a couple of jaw needle nose pliers. This wire must be held to max 1 ¾ inches from the end of the wire. At the end of the wire, slide the hook. The final size of hook depends on personal preference and the buzz bait.


2 step - you now need to get the cable around the hook and needle clamp with the second pair of pliers in order to successfully form a loop. Now, you must withdraw without strings end up on the main wire and bend the free end around the main wire so that it will close the loop and hook to secure your place. Now is the time to remove the needle nose pliers.


Step 3 - it's time to slip rubber skirt on in-line spinner body and push it to the wire followed by one / two-color beads, if desired. In this way, it will add weight buzz bait casting and will help the bait to sit in the water at a time when it will reach.


4 step - take your wire and bend 2 ½ to 3 inches above the loop you made in the previous steps at the end of the wire. Take the pliers and use them to bend the wire down to form a ½ inch wide long in shape. You should measure ¾ inches down "U" shaped bend in the wire and bend the wire at a right angle.


Step 5 - Your last step is to measure about 1 cm and bend wire again using the pliers so that the wires are pointing downwards. Take a knife and rumors put it at the free end of the wire pointing down below the collar fasteners. You must ensure that the wide flat end of the rivets was along the blade. Now is the time to complete the buzz bait wire bending beneath the rivets, a right angle. Next, trim the wire so that it will extend no more than about ¼ inch from the bend below the rivets.


As you can see, the process of creating your very own home-made lures for bass fishing is not very difficult, you just have to be very careful and take things nice and slow. Read these steps over and over again until you do it right and some of his, save lots of money.


Read More >>

Minggu, 21 Agustus 2011

Basic Tools for Beginners to Jewellery Making


Many people are taking up the hobby of jewelry-making meeting. There are so many tools at their disposal a beginner at handmade jewelry that can be very confusing. There are however some basic tools you can use at the beginning, cost very little and will help you to create handmade jewelry that looks professional.


tools recommended in this article are for those who want to create your own beaded jewelry.


Tongs


There are an unlimited number of forceps are available, but do not have to have all of them but the beginning. Pliers are used to hold, shape and bend metal and wire.


Chain pliers


These are good all round essential set of pliers. They are ideal for crimping, opening jump rings, closing bead tips and holding small parts safely. Chain pliers have jaws that are smooth inside, round and taper to a point.


Flat pliers


These pliers with straight jaws on all sides, sharp corners and wide at the top. Flat nose pliers are used to flatten the wire, the spirals and sharp corners.


Round nose pliers


Another important set kliješta.Okrugla forceps were used to create the loop and wire wraps. Loop and wire wraps are used to attach the findings, such as earwires and accessories for your nakit.Petlje should be smooth without the rough edges and the calipers help you achieve that. These forceps should not be used to hold the stuff.


Crimping Pliers


These are not essential at first, but you May want to buy a crimping pliers after you commit to making jewelry as a hobby. They are specifically designed for closing crimp beads. They crunch wrap smoothly. You can use the chain nose pliers to close the crimp beads when you are starting out.


Bent chain pliers


pincers are curved and very pointed and are used for holding objects in particular cable or wire that is short or hard to reach places. They also help to open the thick gauge jump rings, giving a better use.


Coil Tongs


If you find that you have a problem in creating a good wire wraps or loops you can opt to invest in these pliers. They are designed to help you make consistent loops and coils. They are used by holding the wire with a flat jaw, and a rotating circle of jaws in the shape of the loop. But a few hours practice with round pliers, and some inexpensive fuse wire will help you get the sense wire wrapping.


Split Ring Pliers


These tend to be more expensive than a circle and chain clamp. This is a personal preference whether you need to have these pliers. They are designed to help you open the split ring.


Split rings are rings of little use to connect to your work there safely. Split ring pliers are not really necessary, because Split rings are usually made from thick wire. May they be necessary, however if you have dexterity problems or have long fingernails, and the value of your manicure.


Cutters


cutters used to cut wire and trimming jewelry findings.


Flush Cutters


Flush cutters are precision cutting, which will allow you to get close to your work. They can also be used to cut off the excess wire on the head and eye pins and provide orderly and safe finish. These cutters are better sidewire cutters as you can get much closer to the cut and so there is less chance of leaving a sharp edge. Inevitably more expensive.


Sidewire Cutters


Sidewire cutters have sharp jaws that will help reduce the chain of jewelry and beading wire. They allow you to cut closer to the work piece and cut the gap. They can also be used to cut off the excess wire on the head and eye pins and give a neat finish.


Memory Wire Cutters


Memory wire is very strong, hard wire. It is absolutely essential if you work with him to buy wire cutters made ​​specifically to reduce the memory wire. You will damage ordinary thickets beyond repair, if you use them for cutting memory wire.


Various tools


bead board


beadboard is vital for the development and installation of necklaces and bracelets. Beadboards are usually made ​​of molded plastic and have a flocked surface that helps to prevent balls from rolling about. They usually have a bead storage compartments and the rulers that you can use to measure your piece.


bead mat


If you want to make a great piece of beadboard that can not receive, or to work on a tray at knee then bead mat is essential. They are made of micro fiber and beads they stop in their tracks. This is very useful if you want to sort the beads that will stop them spilling all over.


Bead Reamer


Bead reamers are tools that are used to enlarge and clean bead holes, and smooth away rough edges.


Low Tack Tape


This is ideal for holding beads in place on a wire. Tape one end before you start to put the ball. It stays put, but when you remove the tape that leaves no sticky residue and does not flex beading wire.


As with any hobby, the initial costs can be astronomical. Jewelry is not an exception. You can limit spending in the beginning and still make exceptional peices of handmade jewelry.


Once you have done for a hobby, then you can build your collection of tools as much or as little as you please.


Read More >>

Jumat, 19 Agustus 2011

In Praise of Pliers - Advice For the Novice Jeweler


I started to make simple jewelry 8 years ago - an elastic beaded bracelets, then strung beads on a string, which is held in place with metal crimps. At that time, helped me be a fairly simple, beads, cord, and a pair of pliers. Ah, pliers! Who knew there could be so much to say about these tools.


Actually, before I talk about the forceps, I have a generalization of that:


Above all, when you embark on your jewelry making adventure, make sure you buy the absolute best tools you can afford. Or even the best tools you can afford. Nothing will make your life easier, but a great tool, and nothing will make you more miserable than an inadequate one.


Of course I have read this advice - and even heard first hand from others - when I began to make jewelry so many months ago. But I, thinking he knew best, it shrugged off. My tools seem perfectly fixed in time, why would I spent 3 times the cost for something I could see it was better

?

First, a great tool that works the way a bad tool simply can not. It is comfortable in the hand, wrists, or moving parts to open smoothly, the metal is tempered, even without a pit, and you can use those tools until they become an extension of their own hands and not to crump out [. [/ P>

For comparison, even I could see that my poor tools su.Kliješta awkwardly, with his jaw too heavy, it is almost impossible to use for delicate wirework. They were made by some to appoint a pot metal, rusted and pitted, and within a few months of my buying them. Their very rudeness made ​​my own rough work.


Finally, I upgraded my basic pliers for a better grade, made in Germany, but later I made ​​the leap and bought a whole set of first-rate tools developed in Sweden and Lindstrom Swanstrom. These tools have become very epicenter of my jewelry making life, and without them I could not work.


This brings me to my second piece of advice, a little more specific. There are three types of pliers I want to draw attention to that will greatly enhance your ability to fine-workwork, and I highly recommend you invest in them without delay. These are:


    metal forming pliers
    bent-nose pliers, a
    long chain-nose pliers
If you work with sterling or gold wire, metal shaping pliers will help you to bend without crimping, dinging or denting the places that matter . One jaw is round and the other is flat and slightly concave, so that when the moment is made, or pressure inside the metal jaws do not deform. I found this especially valuable when bending 20-gauge wire and thicker.


I can not live without the bent-nose pliers, mainly for all the wire-packing work we činiti.Savijena tips allow me to bend and wrap wire without putting pressure on my wrist, and that in some strange areas, without damaging the existing business.


And finally, if you were stranded on a deserted island, a long chain, pliers would they want to be with me. Long chain-nose pliers tips are long and tapered, so that they can work in tiny, hard to reach places in the hardest of the wire-work challenges. They are essential for maintenance while the tiny loop wrap it close to the bent-nose pliers. For comparison, a regular chain pliers jaws are too stocky and thick and almost useless for this kind of work.


I keep all my calipers clean and dry, wiping them down every six months or so, and spritzing the joints with WD-40 from time to time to keep the hinges lubricated. They are a joy to work with every day. Even on my crankiest days, I can not use tools as an excuse not to work. My tools are my friends.


Read More >>

Easy Bangles-Making


Making your own accessories is easy! All you need is five trendy beads, six with holes large enough for your 15g wire, round and chain nose pliers, 18g wire, wire cutters and at the end of the eighteen gauge wire. See? With only this, you are ready to make your own bangle.


, so here goes. Cut a piece of wire (15g). Remember not to correct for the way he bent the ideal form of a bracelet. Then, with a round pliers, grip the end of the central part of the wire loop to the opposite direction of the curve the wire. I now have a loop for the head pin.


On the other side, slide beads. You can play with the combination and how you want to just keep in mind that when the beads to stick together until the scope of the wrist. Also keep in mind that if you are working with lampwork beads, then you need to add one and a half inches to your length. Well, if you think that is too much hassle, just try to estimate the length of it trying to put it on. You can fairly gauge the length required.


Now, when everything is all set and to your liking, you can make another loop. With your circle nose pliers, holding the wire after the last grain. Then bend the perfect loop. After that, cut the excess wire. But be very careful with your eyes while using the cutter. Then, even out of the loop.


Making Supplies is easy does not it? So the next bend Bangle in a round shape that fits your wrist and keep the difference between both sides, because this is where you attach the buckle.


There are many types of clasps, but then S-clasp would be more appropriate for Bangle equipment.


This is how you can make your e-clip. You can get a 18g wire and make a loop with round pliers. This is basically the same concept as how you make a bracelet. But let's not live on it a lot. Moving on, after they formed a loop, using pliers, holding the wire and make another loop. This time, it's up and to the right. Then wrap it around the pliers' bottom prong and let go. Then hold the loop up and down on the right. Keep in mind that the loop should be a big loop. Then you wrap the wire around the top prong of the round clamp and connect it to the bottom prong . Then you do a loop and cut excess wire. Remember to be careful with your eyes.


At the end of the buckle to attach hooks to the bangle and voila! You now have your bangle.


Read More >>

Kamis, 18 Agustus 2011

The Right Pink Pliers


When it comes to what you will want your tool box contains, then I am sure you will not want to miss any important tools you will need, for example, when they will be moving into a new home. Mot people agree with the fact that it is a tool that will always have to be in the tool box, a hammer and yes, I also agree on this one.


But what of the calipers? You should know that the calipers are also one of the most commonly used tools in the house and you will need to have one in your toolbox as a permanent "resident" of him, right? When it comes to what you will be able to use the pliers, there are many projects that we will talk about in the following minutes. Here are some of the few reasons that you should always take into account that a pink pliers in the toolbox.


1 If you have furniture that you need to assemble or toys, you will certainly pink nippers. Why? Well, when it comes to the general fear that everyone finds this tool, they will look very boring and the reason that people are starting to use brightly colored tools, because they have a good mood and make them feel more confident about the task at hand. Furniture is also rare these days to be together and if you do not have pincers that will help you with the process, you will have a difficult time installing.


2 Craft projects are another reason why you should take into account the pliers. So if you have a child, and he will have a piece of wood used to build something and need to be glued together, you know that you can not just hold them together with your hands until they will get nice, for what you get glue on your fingers and the how can I be exposed to a variety of unpleasant and possibly harmful scenarios. In jewelry making, for example, a wire for cutting is vital, and so are the needle clamp.


3 Broken bulbs are still situations in which you can use some pink accessories. If you were removing the bulb and suddenly got broken, well, getting the rest off by hand can be quite dangerous, so that is why the clamp is your safest bet here.


Using pink pliers will not only make you feel better about the task at hand, but maybe your wife will get to the task, so it is excluded from further trouble.


Read More >>

Electrician Tools Needed For Electrical Jobs


Tools needed electricians


for electrical work electrician must be equipped with the right and proper equipment. Lately a lot of advanced improvements have been made in relation to various types of tools that are available. While the tool options include some that proved very useful and others that prove to be of less use, some regular tools are required in most electric events.


Electrician tools: Hand tools


for the efficient operation of an electrician needs to possess a number of basic tools. Thanks to advances in technology today, the fundamentals are better than older models and provide more comfort and security than its predecessors.


These include:


Screwdrivers and Nut Drivers: These come in different shapes and sizes. They work with different types of fasteners and applicators.


Measuring Devices: If we take the time to observe electricians we notice that most of them walk around with their tape devices attached to their belt as the majority of electrical work requires measurement.


Fish bar and a half: Fish tapes are used to install new wiring through walls and electrical conduit, and the fish piers help in bringing down wires in ceilings, walls down, or under raised floors.


Wire stripper: They are used to strip of power. They are conveniently designed to provide comfort at hand when it is used.


Tongs: This we know is used to hold items securely while cutting, bending or giving physical compression. There are several different types of pliers that are used for various purposes, they are mainly used by hand, pliers and a long-nose or needle-nose pliers

.

Labeling Machines : a wide range of labeling materials including ID box, rack and panel, cable and wire markers, labels and specialty label objects.


Electrician tools: power tools and machines


power tool may be cordless or corded, and these are powered by electric motors, internal combustion engines, direct combustion of fuels and propellants, compressed air, or even natural power sources such as wind and water movement. They are classified as stationary or portable, the portable hand tools. As we know, the most used tools powered drill and saw.


Electric Power tools include drills and saws. Type blade is used varies for different types of electrical work, and it is also a power drill.


Electrician Tool: Safety equipment and precautions


It is important for an electrician to have all the safety equipment needed for any given job, for example, safety glasses, gloves, dielectric footwear, clothing and necessary, etc. It is of utmost importance for their safety. And we all know that saying "prevention is better than cure ".


Read More >>

How to Tighten Tension Wire on a Chain Link Fence


You decided to build a chain link fence. Do you have a set of posts. You can even figure out how to get the rail ends and the top rail in place. Now it's time to put on the bottom of the wire tension. No matter how hard you try or how hard you pull strings, you just can not seem to be tight.


common wire used as a bottom tension wire on a chain link fence is 9 gauge galvanized wire. It usually comes in rolls of 170 "or više.Žica is thick, heavy, and it is difficult to stretch. Here is a simple way to tighten the wire, and all you need is a pair of pliers. Start by attaching one end of the wire to the terminal post (also known as post offices and corner post). Put the wire through the brace band and wrap it around a few times. it is not recommended to try and pinch the wire brace band to secure it. Roll wire along the fence line.


Cut the wire a few feet past the next terminal after you provide him in. Walk The Line fence again and check the tension wires no kinks, not captured in any roots or the growth, and get as many of the "loops" (which caused the valid) as you can. Take the free end of tension wire and thread through the band of brothers at the terminal after you attach too. Pull the wire as tightly as you can get, and wrap it around several times as the first post.


wire should be quite broad, but it can push away from the area around the foot. Tighten your band of brothers. Take your pliers (lineman pliers work best) and grab the tension on the wire with pliers or one of the terminal posts. With a firm grip pliers to twist left or desno.Napetost wire will form "z" are involved. Work your way down the fence line twisting tension wires in this case at every post.


you'll notice further down the line work, the harder the wire twist. This is due to wires getting tighter and less slack being able to be involved. Put as many twists in the wire to achieve the tension you desire.


This is an easy way to tighten the bottom tension wires and check the bottom of the chain link fence is secure.


Read More >>

Rabu, 17 Agustus 2011

Jewelry Making Tools - Their Proper Usage


making your own jewelry, the first thing you want to prepare their materials and tools. Many still question what they are most needed tools for jewelry making, and how they can use, or are they really important? Do they need all those tools in making jewelry? Well, sometimes it is very necessary to have all those tools are ready, it's much better to be always well equipped. In this article you will be instructed in the jewelry making tools and their proper use. Starting to work with the tools can be dangerous if you are not familiar with them, so finding some safety tips for making jewelry advice is important to do. Even learning a simple design such as how to make a button bracelet will require some knowledge and safety guidelines to ensure that you do not get hurt.


Pliers - this tool for making jewelry comes with a variety of shapes and sizes. These are examples of features:. Long Flat Nose, Long / Flat pliers, Round nose pliers, split ring layers, round / session Pliers, Nylon Jaws (Flat pliers), a bead crimping pliers


* Long Flat Nose -. These types of pliers are used to shape, form, gold wire or straightened without damage to the metal I


* long nose Apartment / Flat pliers - to be used for a loop, bend or coil wire or flat stock without damaging the metal

.

* Round Nose Pliers - These pliers have two types of conical jaw. It is used in making loops with pull wires or other materijala.Petlja size determines how the jaws are made. If you want to make a small loop, do it near the tip of the forceps, or a loop is made near the hinge clamps.


* Split Ring Pliers - this is a special type of pliers to hold the ring Split open to connect other parts of the ring. Simply insert the curved tip forceps into the ring by the handles and squeezing the pliers, open split rings. To add charms or beads to the ring, the curve of the top securely holds the ring.


* Round / Meeting Pliers - this type of clamp is used to reshape the ring shanks, and also used in bending or forming wire and flat stock

.

* Nylon Jaws (Flat pliers) - This type of clamp jaws which are made ​​of najlon.Najlon is softer than wire jewelry that you can not make a scratch mark or jewelry wire. It is often used in wire straightening and straining wire components aligned and harden them. Once straightened, the wire is pulled through the jaws of nylon jaw pliers.


* Bead Crimping Pliers -. This is used in the compression tube and ball in a smooth circular crimps without unwanted sharp edges


Cutter - eg. End Cutter, Side Cutter and jewelry Sniper


* End Cutter - the end of the cutting jaws have to be blunt with blades perpendicular to the handle. It is used in making crisp, clean cuts on žice.Lopatice eventually proved more cutting leverage.


* Side Cutter - This type of cutter are the jaws that are highlighted and kutom.Kutna is designed almost parallel to the handle, so cut the upper side of the cutter.


* Jewelry sniper - the jaws of the cutters are prominent. It is usually used for sheet, wire and beading cord or string.


* Tweezers - to hand tools used in picking up small objects such as beads. It is also used in grasping and holding the beads and bead wire thread.


Now that you have knowledge of various tools used, it is important to learn when the draw: how to organize my beading stuff. Once the tools lying around can mean that they get lost or damaged;. Organized will save you a lot of time and help you become more productive


Read More >>

Selasa, 16 Agustus 2011

Types Of Pliers


Tools are important. To complete the construction project or home-improvement project, you must have all necessary tools. These tools can come in different sizes can be big or it could be small. However, regardless of their size, these tools will help you finish your project. When it comes to adding the final touches on the project, there are certain tools that you possess. One of these tools is a pair of pliers. What is this tool? This tool is specially designed hand tools to cut, bend, or compress the material.


There are different types of pliers, each with a specific purpose. Here are some of them.


    Long-nose - they are also known as needle-nose. This type is usually used for holding things that are small. Those who are in arts and crafts are familiar with this species. Those who commit this type of equipment used pliers to bend wire to form a design.
    Long-nose - they are also known as needle-nose. This type is usually used for holding things that are small. Those who are in arts and crafts are familiar with this species. Those who commit this type of equipment used pliers to bend wire to form a design. ...
    lineman's pliers - this type is most useful for electricians and those working around electrical wires most of the time. It is perfect for cutting and bending electrical wires.
    Round Nose - This is another must have tool for people who love making accessories. An important tool in the craft of making this clamp is used to create a circular wire rings, bracelets, earrings, necklaces i.
    Crimping Pliers - this is used for connecting and closing the two ends together. An important tool in the industrial sector, it can come with a hefty price tag.


Other types are available and you might want to check it out, but do not let that confuse you. Choose only what you need.


Read More >>

A Few Beads, Wire and Pliers Equals 10 Minute Earrings


Have you ever bought a really hot outfit, because you've been anticipating the release of the truly stylish night on the town? And then, when you got home you suddenly realize that they had the perfect pair of earrings that would compliment your beautiful new clothes?


If this happened to you (or if you do not ever want too), with a little preparation and ten minutes of your time, you'll always be able to have the perfect fashion accessories you want. And for that, all you need is a modest selection of beads, some wire, chain nose plier and a round nose plier. You can easily buy these things either online or at local craft stores.


Here are the supplies and tools you will need to make one pair of earrings:


- 2 - 8 mm color glass beads
- 2 - silver bead caps 8mm
- 2 - silver earring wire (french hooks)
- 2 - Silver Headpins (normal)
- Chain nose pliers
- Round nose pliers
- Flush cutting scissors jewelry
- Safety glasses


Follow these six simple steps, you can make a pair of earrings to compliment any outfit you want.


(1) Slide a strand of one of the Headpins, who finished with a bead cap.


(2) Use the chain nose plier holding the bead, bead cap and headpin. Hold your nose plier circle on the other hand and use it to wrap the excess cord around headpin headpin the stem, just above the bead cap and below the loop.


(3) After the formation of its first loop, make 2 or 3 coils tightly around the stem and below the loop. This will ensure that the bead headpin.


(4) Put on your goggles and cut off excess wire headpin.


(5) If the remaining piece of wire, the jagged, to grab the chain nose pliers and press jagged branch back to headpin the stem.


(6) Repeat this procedure to other earring.


for a variety's sake, you can slide one or two small beads, perhaps in a contrasting color, the headpin before the slide, 8 mm beads on it.


handcrafted jewelry that is fun, inexpensive way to add subtle nuances you need to bring out the best in any outfit. If you search the Internet you will find very few companies that specialize in helping the novice and expert jewelry maker. One of the really great things about this hobby is that it does not take much money to get started. And a few minutes of your time (with a little practice), it can make you look like a million dollars every time you go out.


Read More >>

Hand Tools Check List


There is nothing worse than finding out you do not have a hand tool you need when you need them. Probably one of the worst feelings is knowing that you'll have to drop what they're doing to run to the store for a small bump or turn the tube, something you probably should have on hand to start with

Most discount stores do a pretty good job of providing you with one of those little kits that have "whatever it takes" around the house. I say Phooey! If you do not have enough tools to repair the USS Bjelica, then you do not have any tools at all! Somewhere between their personal theories and one of those small chain of discount stores is the truth. We put together a little checklist to help you out.


Hammers are where. If something does not fit, he hammer it into place. I promise, you will need two hammers around the house. One small picture nails and one for which a Honkin 'want to drive nails into the following situation. Having a small hammer to hammer a greater need for others. I'm pretty sure you can figure out what to use when.


screwdriver set is definitely needed. One of these universal "all" sets are nice, but the parts tend to get lost. For this reason I like old-fashioned set the all-in-one. Back up to back up. Plus universal sets usually can handle the torque shaft may be solid, so it is better to have both ends covered.


for the pliers, using a standard adjustable pliers and needle nose pliers. Each can be used for several different things. Needle nose pliers are great for things like getting the screws that have broken out of the closet or a nail file that runs too far in. The standard pliers can be used on small tubes or strained water equipment or anything else you might need tightening.


a set of pipe wrenches, small and large are also a good idea. While the pliers are great for smaller projects, pipe wrenches are constructed of tubes and they should be used to that, the pipe. Nothing can take its place for the torque and iskoristite.Cijev saw or hack saw is also a good idea. They are quite versatile in that it can be used on other things if needed.


Next we need to look at drill with bits. Any exercise will do, but I think the wireless for home use. Why? Since it is not always around electrical outlets and it is easier than the 50 foot extension cable. They do not make those cordless screwdrivers. I do not show very often, they fall into the "better than nothing" kategoriji.Lijepo sized cordless drill will do.


from this list will not be able to build the ark, but you will be able to fix things around the house. These tools cover almost every household basic needs. It is suggested that you get a nice measuring tape, and, you know, to measure. Good luck in everything you do and remember to watch those fingers!


Read More >>

Senin, 15 Agustus 2011

Home-Built Skewer Rack For the Bbq Grill in 20 Minutes - Can You Say Shrimp Shish-Ka-Bob!


I love shrimp! In any case, anyway, but especially with roštilja.Problem grilling delicate treats like shrimp, preventing them from any adhesive, or slipping through the bars!


Cooking Shish-ka-bobs, with layers of savory items scored on a spit resolve "slipping through the bars," but does not adhere to the problem. No amount of PAM seems to work for me on the grill, and even worse, a spatula strokes of the best parts. I bet if I looked, I could find a skewer rack manufactured in a specialty store - at a price


But I'm on a budget, I do not like shopping, and I have a 1 kg golden shrimp ("king prawns") that are waiting on the grill!


I rummaged around my workshop, after picking up shrimp thinking I had some remnants of the angle, steel or aluminum. Nope! But I did find part 1 / 2 "copper pipe from the old project, and galvanized wire are from an older project. Even better, the copper is easy to work with, and the wire stock to a perfect edge banding materials, both of which should survive the fire in my grill i have a well-stocked shop with hacksaws, band saws, and guess what -.! my old pipe cutter is 41 "long. I made ​​my grill and decided 10 "top width, with two 5 1 / 4" DNA pieces all the wires connected and bundled together to give me the maximum and the spit at the bottom of the track.


Twist-bolt, screw and twist-pipe easily parted with pipe cutting! You can use a hacksaw, pipe cutter, but leaves a perfect closed end. I cut the wire into 6 "lengths and used it as a wire them on the bread-bread (although I use the duck-bill pliers to really cinch fabric. Cut, with a diagonal cutter pliers to cut the surplus, and man! One last improvement:. And V-grooves cut into the top surface of every inch of the skewers from rolling off, and more importantly, locking skewers in place so as not to tip in one place


Now, for the simple Shrimp Shish-ka-Bob's prescription.


peeled prawns marinated in Teriyaki sauce for 1 / 2 hours (I prefer Kikkoman). Since I just picked up shrimp, and it was packed in crushed ice, I have a small bowl of shrimp / marinade mix set in larger bowl filled with ice. I found marinading shrimp works best when kept cool, either on ice or cooling in the refrigerator. I love the taste of grilled tomatoes and onions, pineapple chunks and blend perfectly with the flavor of teriyaki. I cut the cherry tomatoes in half and quarter onion. Using the (well-soaked!) Bamboo skewers, I just stabbed him all along. Art, I like to alternate colors - red (tomatoes), white (onion), yellow (pineapple chunks) and pink (shrimp! ).


Preheat the grill to HOT! - Then go down to low before the creation of a new Shish-ka-Bob shelves! They do not take long to cook, and the bamboo does not take long to burn through! When you see the skin begin to shrivel tomato, onion and edges browning, it is done.


nice variation on this recipe: roll shrimp in honey, and they stir in chopped almond slices


I hope you enjoyed my lunch recipe and my home built skewer rack as much as I did. By the way, stands worked perfectly, connected together bundles of copper pipes were stable, elevated surface with Kos, but they kept close, and prevent them from moving so I could rotate the skewers for even cooking. Best of all - anyone can build this project stove improvement on waste, ingenuity, a bit of time


Read More >>